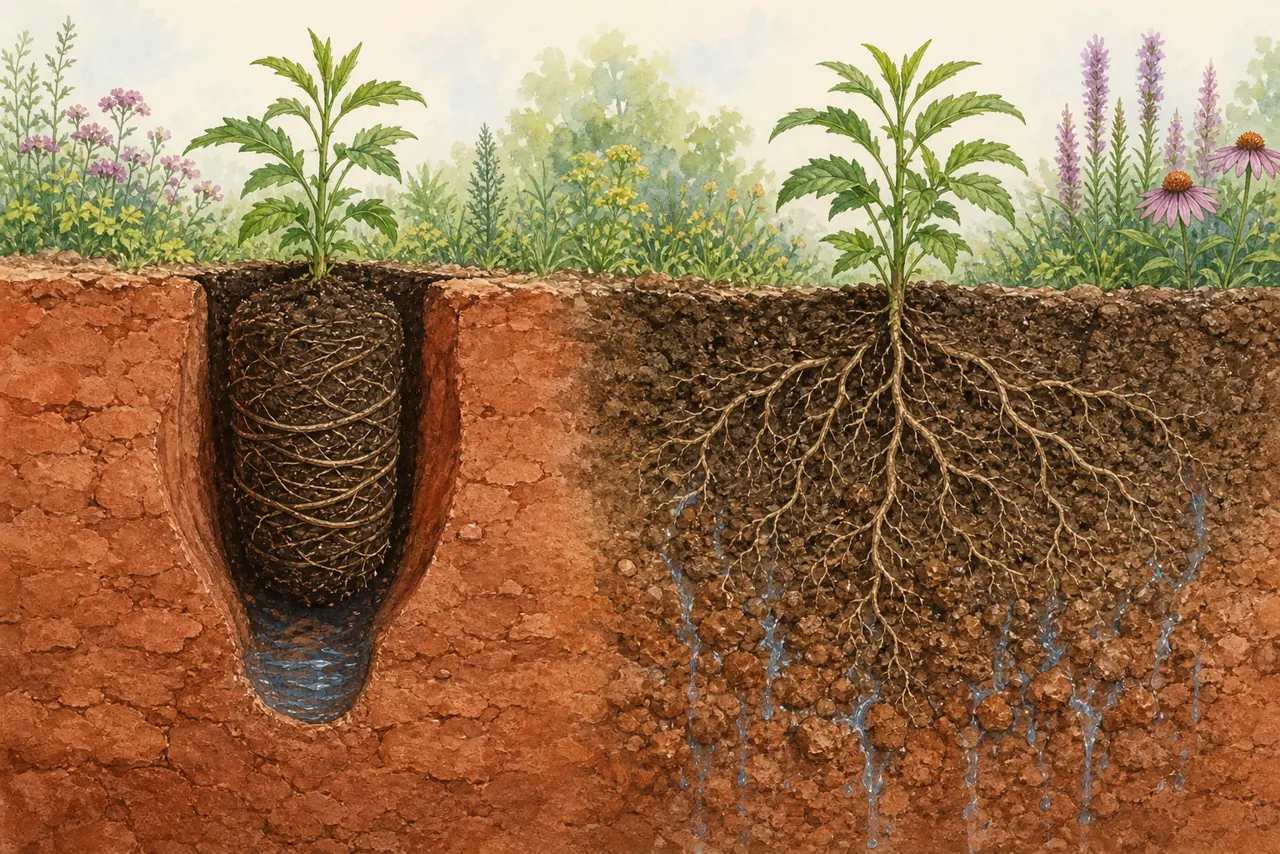
“Clay soil” describes a fine mineral texture, but it does not tell you everything a plant experiences. Clay can hold water and nutrients; the same soil can also become compacted, oxygen-poor when saturated, or hard when dry. Slope, construction disturbance, buried subsoil, organic matter, and nearby roots can make two clay beds on the same property behave differently.
Prepared by Pocket Habitat · reviewed against Penn State Extension planting guidance · editorial method
Separate texture, drainage, and compaction
Texture is the proportion of sand, silt, and clay. Drainage describes how water moves through the profile. Compaction describes how tightly the particles and pore spaces have been pressed together. A clay loam on a gentle slope may drain adequately, while disturbed subsoil beside a new foundation may remain saturated after every storm. Do not choose plants from the word clay alone.
Start with three observations: whether water stands after rain, whether a hand trowel can enter the soil without excessive force when it is moist, and whether roots are already growing through the layer. A laboratory soil test can guide pH and nutrient decisions, but it does not replace an on-site drainage observation.
Observe the actual planting zone after rain
Walk the site during or soon after a soaking rain. Mark runoff paths, puddles, downspout discharge, and the first places to dry. For an infiltration check, use several small holes in the proposed bed rather than one convenient hole at the edge. Fill each once to wet the surrounding soil, allow it to drain, refill it, and record how the water level changes over time.
The objective is not to assign a universal pass/fail rate to every garden. It is to distinguish a bed that drains between ordinary storms from a depression that stays saturated. If the test intersects a utility, large woody root, septic component, or unknown buried material, stop and choose a safer location.
Plant when clay is moist, not smeared
Very wet clay can smear into a slick surface when cut with a shovel; very dry clay can fracture into hard blocks. Work when a handful is moist enough to hold together but not so wet that it shines and coats the tool. Penn State Extension advises roughening or scoring glazed planting-hole sides so new roots are not contained by a compressed wall.
Make the opening wider than the root mass and no deeper than needed to keep the crown or root flare at the appropriate finished grade. Set the plant on firm, undisturbed soil so it does not settle. For herbaceous plugs, open only the space needed for the roots and firm the existing soil gently around them without crushing the pore spaces.
Avoid the amended-pot effect
Replacing the soil in one narrow hole with a rich, loose mix creates a sharp interface between the planting pocket and the surrounding clay. Penn State guidance favors using the excavated soil for most backfill and warns that large amounts of organic matter in an individual hole can hold excess water or encourage roots to remain in the pocket.
If a whole bed needs improvement, treat the bed as a system rather than creating a separate pot around every plant. Protect the surface from foot traffic, keep machinery off wet soil, retain fallen leaves where appropriate, and add organic material at the surface over time. Do not add fertilizer, lime, gypsum, or sand automatically; use a soil test and regionally appropriate guidance for the specific problem.
Match the plant to the moisture pattern
A sunny clay bed that drains between storms is different from a low clay pocket that stays moist. In a dry-to-medium sunny zone, candidates may include little bluestem, butterfly weed, or aromatic aster. Butterfly weed needs the freely draining portion of the bed; it is not a solution for a winter-wet bowl.
For medium-moisture or moisture-holding conditions, foxglove beardtongue, clustered mountain mint, golden ragwort, or Virginia sweetspire may fit, depending on light, mature spread, and local range. Keep colony-forming plants away from narrow access routes unless their boundary is part of the plan.
Use a condition-first planting sequence
- Map sun with the one-day light method.
- Observe drainage in more than one part of the bed.
- Confirm underground utilities and keep clear of building-service routes.
- Use the plant finder to intersect light, moisture, height, and growth habit.
- Compare the result with the more detailed Maryland clay planting plan and a measured garden plan.
- Plant a manageable section first and use the first growing season to observe survival, spread, and moisture.
First-year care reveals the real site
Water deeply enough to wet the original root mass and nearby soil, then allow the surface response to guide the next check. A light surface sprinkle can leave the root ball dry; automatic daily watering can keep slow-draining clay saturated. Keep a small weed-free area around each crown and use a modest surface mulch or retained leaves without burying stems.
After storms, note which zones stay wet and which crack first. Record plant lean, crown loss, and unusually slow growth. Those observations help distinguish a poor species match from a planting-depth or drainage problem and are more useful than forcing the entire yard into one “clay” category.
- Penn State Extension — Plant with Care ↗
- Penn State Extension — Planting Ornamentals ↗
- Penn State Extension — Understanding construction-damaged soils ↗
Drainage thresholds depend on the project and plant. This guide does not replace structural, stormwater, septic, or utility advice. See Sources & Methodology.